We're now ready to put the main content into the Spanish handbook. Let's start off with this:
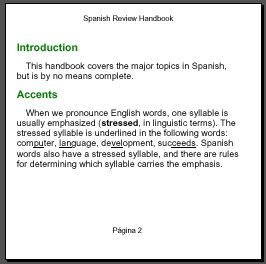
This handbook covers the major topics in Spanish, but is by no means complete.
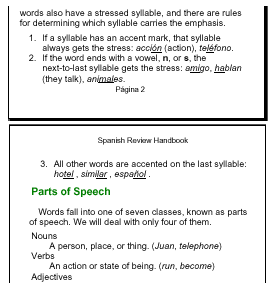
When we pronounce English words, one syllable is usually emphasized (stressed, in linguistic terms). The stressed syllable is underlined in the following words: computer, language, development, succeeds. Spanish words also have a stressed syllable, and there are rules for determining which syllable carries the emphasis.
The headings and paragraph will be <fo:block>
elements, and the bold and underlined words will be
<fo:inline> elements. Let's start with a description
of the first heading.
<fo:block
    font-size="14pt" font-family="sans-serif"
    font-weight="bold" color="green"
    space-before="6pt" space-after="6pt">
        Introduction
<fo:block>
the space-before and space-after are just a few
of the many properties that you may set for a block. Many of them
are exactly the same as the properties you can use in Cascading
Style Sheets (CSS)
font-family, font-weight,
font-style (italic), font-size,
font-stretch, font-variant (small-caps)
background-color, background-image,
background-repeat, background-attachment (scroll
or fixed)
border-location-info where: before, after,
start, end, top, bottom,
left, or right style, width, or
color
padding-location where: before, after,
start, end, top, bottom,
left, or right
margin-location where: top, bottom,
left, or right
text-align and text-align-last
(for last line of text in block );
values can be start, end,
left, right, or center
text-indent (first line),
start-indent, end-indent
wrap-option (no-wrap or wrap);
widows and orphans (determining
how many lines must be left at top or
bottom of a page)
break-after and break-before (when
to do page or column breaks);
reference-orientation (rotated text in
90-degree increments)
Given this large number of options, we can have a fairly complicated
block definition for the paragraph. The definition below uses the
dot-notation “compound datatype” to allow the page layout
mechanism some flexibility in paragraph spacing. Instead of just
telling the formatting program that we want 4 points of space before a
paragraph with space-before: 4pt, we can say that 4
points of space is the best (optimum), but the formatter may use as
little as 2 points or as much as 6 points to achieve a better
result.
<fo:block
    text-indent="1em"
    font-family="sans-serif" font-size="12pt"
    space-before.optimum="4pt"
    space-before.minimum="2pt"
    space-before.maximum="6pt"
    space-after.optimum="4pt"
    space-after.minimum="2pt"
    space-after.maximum="6pt">
This handbook covers the major topics in Spanish, but is by
no means complete.
<fo:block>
If your document has twenty or thirty headings and seventy or eighty paragraphs, you don't want to type (or copy and paste) all of these Formatting Objects elements. This is where XSLT comes in. We will write our document in HTML, and then use an XSLT to transform it to the far more verbose XSL:FO version. Here's the HTML so far:
<h3>Introduction</h3>

<p>This handbook covers the major topics in Spanish, but is
by no means complete. </p>

<h3>Accents</h3>

<p>When we pronounce English words, one syllable is usually
emphasized (<b>stressed</b>, in linguistic terms).
The stressed syllable is underlined in the following
words: com<u>pu</u>ter, <u>lan</u>guage, de<u>vel</u>opment,
suc<u>ceeds</u>. Spanish words also have a stressed
syllable, and there are rules for determining which syllable
carries the emphasis.</p>
Here are the templates you'll need to do the headings and paragraphs:
<xsl:template match="h3">
    <fo:block font-size="14pt" font-family="sans-serif"
        font-weight="bold" color="green"
        space-before="6pt" space-after="6pt">
    <xsl:apply-templates/>
    </fo:block>
</xsl:template>

<xsl:template match="p">
    <fo:block
        text-indent="1em"
        font-family="sans-serif" font-size="12pt"
        space-before.minimum="2pt"
        space-before.maximum="6pt"
        space-before.optimum="4pt"
        space-after.minimum="2pt"
        space-after.maximum="6pt"
        space-after.optimum="4pt">
    <xsl:apply-templates/>
    </fo:block>
</xsl:template>
What happens to all of the page-initialization code from the
past article? That goes into templates that handle the
<html> and <body> tags. We won't
repeat it here, but you can
see the file.
That leaves the <b> and <u>
tags. Those are inline elements, are handled via
<fo:inline> as follows, with <i>
thrown in as a bonus.
<xsl:template match="b">
    <fo:inline font-weight="bold"><xsl:apply-templates/></fo:inline>
</xsl:template>

<xsl:template match="u">
    <fo:inline text-decoration="underline"><xsl:apply-templates/></fo:inline>
</xsl:template>

<xsl:template match="i">
    <fo:inline font-style="italic"><xsl:apply-templates/></fo:inline>
</xsl:template>
Once we set up the HTML file and run it through XSLT and FOP, we come up with the following page:
The next thing we want to put int he document is the rules for Spanish accent marks. This requires an ordered list in HTML, which we must convert to formatting objects.
Four elements are used to set up a list in XSL:FO.
An <fo:list-block>
contains individual <fo:list-items>. Each list item
is composed of a <fo:list-item-label> and a
<fo:list-item-body>. You set the spacing by setting
the attributes shown in the diagram below:
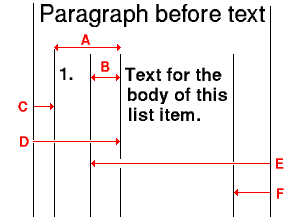
provisional-distance-between-startsprovisional-label-separationstart-indent for list-item-labelstart-indent for list-item-bodyend-indent for list-item-labelend-indent for list-item-bodyWe can now create an XSLT template to handle an ordered list.
By using the relative
em spacing, lists will give reasonable spacing with any
size font.
<xsl:template match="ol">
    <fo:list-block provisional-distance-between-starts="2.5em"
      provisional-label-separation="1em"
      space-before="0.25em" space-after="0.25em">
        <xsl:apply-templates/>
    </fo:list-block>
</xsl:template>

<xsl:template match="ol/li">
    <fo:list-item>
        <fo:list-item-label start-indent="1em" end-indent="label-end()">
            <fo:block>
                <xsl:number/>.
            </fo:block>
        </fo:list-item-label>
        <fo:list-item-body start-indent="body-start()">
            <fo:block>
                <xsl:apply-templates/>
            </fo:block>
        </fo:list-item-body>
    </fo:list-item>
</xsl:template>
You must specify end-indent="label-end()" on the <fo:list-item-label> and
start-indent="body-start()" on the
<fo:list-item-body so that the formatter can
set up the horizontal spacing properly.
Unordered lists are set up similarly, except that you use a
bullet instead of a number. Here's the relevant part of
the definition for list items in an unordered list. The
• is the Unicode representation of a
circular bullet.
<xsl:template match="ul/li">
<fo:list-item>
<fo:list-item-label start-indent="1em">
<fo:block>
•
</fo:block>
<!-- etc. -->
Using the list model to create a definition list where the terms and their defintions share the line space requires some incredibly complex XSLT. (You may see it in the XSL specification, section 6.8.1.1.) Instead, we'll put the terms and definitions on separate lines, as HTML does. This gives us the following XSLT:
<xsl:template match="dl">
    <fo:block space-before="0.25em" space-after="0.25em">
        <xsl:apply-templates/>
    </fo:block>
</xsl:template>

<xsl:template match="dt">
    <fo:block><xsl:apply-templates/></fo:block>
</xsl:template>

<xsl:template match="dd">
    <fo:block start-indent="2em">
    <xsl:apply-templates/>
    </fo:block>
</xsl:template>
Here's a portion of the booklet, showing an ordered list and a definition list. Note that the text flows from one page to the next without our having to do anything special.
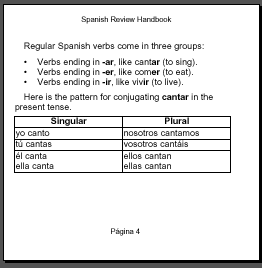
When we get to verbs, we'll have to show the classical conjugation table below.
| Singular | Plural |
|---|---|
| yo canto | nosotros cantamos |
| tú cantas | vosotros cantáis |
| él canta ella canta |
ellos cantan ellas cantan |
An XSL Formatting Objects Table has elements in the following hierarchy:
<fo:table-and-caption>
   <fo:table-caption>
   <fo:table>
      <fo:table-column>
      <fo:table-header>
         <fo:table-row>
            <fo:table-cell>
      <fo:table-body>
         <fo:table-row>
            <fo:table-cell>
      <fo:table-footer>
         <fo:table-row>
            <fo:table-cell>
The <fo-table> corresponds to the HTML
<table> tag, and the <fo:table-body>
to the <tbody>. The only addition of note is the
<fo:table-column> specifier, which allows you to
specify how wide each column in your table will be. You can use
this tag to specify characteristics of cells that have the same column and
span.
In the current (June 2002) implementation of FOP, the
<table-and-caption> element is not implemented,
and you are required to specify column widths with the
column-width attribute in the <fo:table-column>
element. That is, FOP does not automatically figure out how wide
your table is for you.
The XSLT below is written for simple tables. It presumes that all the column widths are specified in the first table row, and that all the widths are in pixels. It's presumed that there are 72 pixels per inch. It doesn't handle column or row spans.
However, it does take into account whether the
<table> tag has a border or not. In the
following XSLT, every time we get to a <th> or
<td> tag, we have to look back at the ancestor
table tag to see if we need to set the resulting cell's
border-width and border-style.
Further, we look at the align attribute of table data
cells to set the text-align of our resuling
<fo:table-cell>. So, take a deep breath and
read on:
<!-- when table-and-caption is supported, that will be the
   wrapper for this template -->
<xsl:template match="table">
    <xsl:apply-templates/>
</xsl:template>

<!--
    find the width= attribute of all the <th> and <td>
    elements in the first <tr> of this table. They are
    in pixels, so divide by 72 to get inches
-->
<xsl:template match="tbody">
<fo:table>
    <xsl:for-each select="tr[1]/th|tr[1]/td">
        <fo:table-column>
        <xsl:attribute name="column-width"><xsl:value-of
                select="floor(@width div 72)"/>in</xsl:attribute>
        </fo:table-column>
    </xsl:for-each>

<fo:table-body>
    <xsl:apply-templates />
</fo:table-body>

</fo:table>
</xsl:template>

<!-- this one's easy; <tr> corresponds to <fo:table-row> -->
<xsl:template match="tr">
<fo:table-row> <xsl:apply-templates/> </fo:table-row>
</xsl:template>

<!--
    Handle table header cells. They should be bold
    and centered by default. Look back at the containing
    <table> tag to see if a border width was specified.
-->
<xsl:template match="th">
<fo:table-cell font-weight="bold" text-align="center">
    <xsl:if test="ancestor::table[1]/@border > 0">
        <xsl:attribute name="border-style">solid</xsl:attribute>
        <xsl:attribute name="border-width">1pt</xsl:attribute>
    </xsl:if>
    <fo:block>
    <xsl:apply-templates/>
    </fo:block>
</fo:table-cell>
</xsl:template>

<!--
    Handle table data cells.  Look back at the containing
    <table> tag to see if a border width was specified.
-->
<xsl:template match="td">
<fo:table-cell>
    <xsl:if test="ancestor::table/@border > 0">
        <xsl:attribute name="border-style">solid</xsl:attribute>
        <xsl:attribute name="border-width">1pt</xsl:attribute>
    </xsl:if>
    <fo:block>
    <!-- set alignment to match that of <td> tag -->
    <xsl:choose>
    <xsl:when test="@align='left'">
        <xsl:attribute name="text-align">start</xsl:attribute>
    </xsl:when>
    <xsl:when test="@align='center'">
        <xsl:attribute name="text-align">center</xsl:attribute>
    </xsl:when>
    <xsl:when test="@align='right'">
        <xsl:attribute name="text-align">end</xsl:attribute>
    </xsl:when>
    </xsl:choose>
    <xsl:apply-templates/>
    </fo:block>
</fo:table-cell>
</xsl:template>
The third person entries require a <br /> tag,
which is translated into FO this way:
<xsl:template match="br">
<fo:block><xsl:text>
</xsl:text></fo:block>
</xsl:template>
And here's the resulting table:
As you have seen, the combination of XSLT and FO allow you to convert your XHTML or other XML documents to a format that is designed for a print medium. These articles only begin to cover the layout possibilities that XSL Formatting Objects give you. For more information about XSL:FO, see Elliotte Rusty Harold's XML Bible, Chapter 15.
See the XSLT file, the HTML file, and the PDF file used in these notes.
You may also see the HTML for the course outline and the XSLT to transform it to XSL FO. This is a more sophisticated stylesheet than the one presented in these notes.