Programming with React
Facebook®’s React JavaScript library is designed to make user interfaces easier to build and manage. React builds a virtual DOM to keep track of and render only the elements change during user interaction. (As noted in Interacting With JavaScript and Web Pages, this is what all the Cool Kids™ are using.)
In this chapter, you will write études that use different ClojureScript libraries that interface with React. This blog post gives you a comparison of the libraries. The two we will use are Quiescent and Reagent
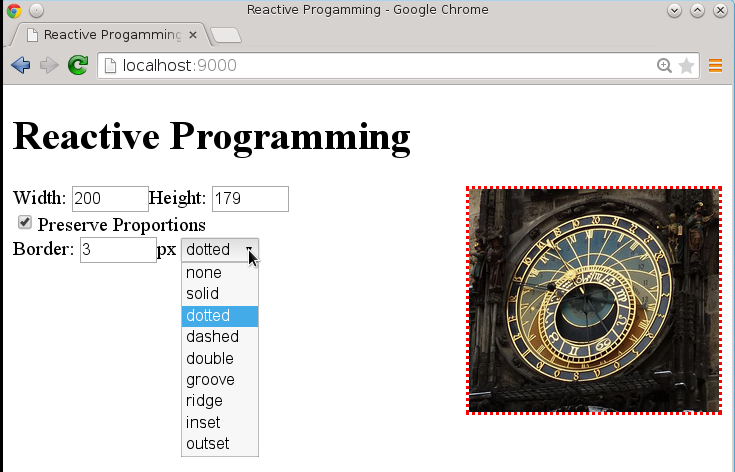
These études will implement the same web page: a page that displays an image and lets you adjust its width, height, and (via CSS) its border width and style. In both libraries, you will build components, which are functions that, as the Quiescent documentation puts it, tell “how a particular piece of data should be rendered to the DOM.” Since they are functions, they can use all of ClojureScript’s computational power.
The HTML for the page will include a <div id="interface">, which is where the components will go.
Both versions of this étude will declare an atom (with a slight variation for Reagant) to hold the state of the the application in a map. Let’s do a quick review of atoms by defining an atom with a single value:
(def quantity (atom 32))
cljs.user=> #<Atom:32>
To access the data in an atom, you must dereference it with the `@` operator:
cljs.user=>@quantity
32
To update an atom’s data, use the swap! function (for individual map values) and reset! (for the entire value of the atom). The swap! function takes as its
arguments:
- the atom to be modified
- A function to apply to the atom
- The arguments to that function (if any)
Thus, in the REPL:
cljs.user=> (swap! quantity inc)
33
cljs.user=> (swap! quantity * 2)
66
cljs.user=> (reset! quantity 47)
47
cljs.user=> quantity
#<Atom: 47>
cljs.user=> @quantity
47
However, in most ClojureScript programs, you do not create an atom for each part of the state you need to save. Instead, you will most often use a map.
cljs.user=> (def inventory (atom {:quantity 32 :price 3.75}))
#<Atom: {:quantity 32, :price 3.75}>
cljs.user=> (swap! inventory assoc :price 4.22)
{:quantity 32, :price 4.22}
cljs.user=> (swap! inventory update :quantity inc)
{:quantity 33, :price 4.22}
cljs.user=> @inventory
{:quantity 33, :price 4.22}
Back to the program for this étude. The page has to keep track of:
- The image’s current width and height
- Whether you want the width and height to stay in proportion or not
- The border width and style (intially three pixels solid)—the color will be set to red for visibility
- The image’s original width and height (needed to do proportional scaling properly)
- The image file name
That gives us this atom.
(defoncestatus(atom{:w0:h0:proportionaltrue:border-width3:border-style"solid":orig-w0:orig-h0:src"clock.jpg"}))
Étude 5-1: Reactive Programming with Quiescent
To use Quiescent, add [quiescent "0.2.0-alpha1"] to your project’s dependencies and add requirements to your namespace:
(:require[quiescent.core:asq][quiescent.dom:asd])
As an example, let’s define a simple component that displays an input area and some text that goes with the w field in the atom that was defined previously.
(q/defcomponentExample:name"Example"[status](d/div{}"Your input here: "(d/input{:type"text":value(:wstatus):size"5"})(d/br)"Your input, squared: "(d/span{}(*(:wstatus)(:wstatus)))))
The general format for creating an HTML element inside a component is to give its element name, a map of its attributes (or the empty map {} if there are no attributes, as on the div), and the element content, which may contain other elements. The :name before the parameter list gives the component a name for React to use. The key/value pairs before the parameter list make up the component configuration; this is described in detail in the Quiescent Documentation. The value of the input field and span are provided by the current value of the :w key in the status atom.
The only thing remaining to do is to render the component. In Quiescent, the q/render function renders a component once. If you want continuous rendering, you can use JavaScript’s requestAnimationFrame to repeat the process. Remember, when using React, only the components that have changed get re-rendered, so you don’t need to worry about that using requestAnimationFrame will eat your CPU alive.
(defnrender"Render the current state atom, and schedule a render on the next frame"[](q/render(Example@status)(aget(.getElementsByTagNamejs/document"body")0))(.requestAnimationFramejs/windowrender))(render)
Quiescent’s render function takes two arguments: A call to the component with its argument—in this case, the de-referenced atom, and the DOM node where you want the component rooted. For this example, that’s the first (and, we hope, only) <body> element.
If you compile this code and then load the index.html file, you will see a zero in the input and output area - but you will also find that you cannot type into the field. That is because Quiescent and React always keep the DOM value and the atom value synchronized, and since the value in the atom never changes, neither can the field. To fix that, add this code to the input element (it is in bold):
(d/input{:type"text":value(:wstatus)<strong>:onChangeupdate-value</strong>:size"5"})
And then write the update-value function, which takes the value from the event target and puts it into the atom that keeps the page’s state.
(defnupdate-value[evt](swap!statusassoc:w(.-value(.-targetevt))))
Voilà—your page now updates properly.
Hints
You will have to initialize the values for the image’s original width and height. To do this, you add an
:onLoadclause to the properties of the image component. Its value is a function that handles the event by setting the width, height, original width, and original height. Use thenaturalWidthandnaturalHeightproperties of the image. Those properties do not work with Internet Explorer 8, but will work in Intenet Explorer 9+.Handling the checkbox also requires some extra care. The value of the
checkedattribute isn’t the checkbox’s value, so you will have to use:on-mountto initialize the checkbox, and you will have to directly change the checkbox status with code like this:(set!(.-checked(.getElementByIdjs/document"prop"))Here is an example of
:on-mountto initialize the example’s input field to the current minute of the hour.:on-mountis followed by the definition of a function that has the current node as its argument.(q/defcomponentExample:name"Example"<strong>:on-mount(fn[node](swap!statusassoc:w(.getMinutes(js/Date.))))</strong>[status];; etc.If you want to use a list to initialize the drop-down menu, you will need to define a component for menu options and then use
applyandmapcleverly. This took me a long time to get right, so I’m giving you the code for free with an abbreviated example.(q/defcomponentOption[item](d/option{:valueitem}item));; then, in the component that builds the form:(applyd/select{:id"menu":onChangechange-border}(mapOption["none""solid""dotted""<em>etc.</em>"]))
See a suggested solution: Solution 5-1.
Étude 5-2: Reactive Programming with Reagent
To use Reagent, add [reagent "0.5.0"] to your project’s dependencies and add this requirement to your namespace:
(:require[reagent.core:asreagent:refer[atom])
Note the :refer [atom] clause; Reagent has its own definition of atom that plays nicely with React; it is defined so that you can use it exactly the way you would use a normal ClojureScript atom.
As an example, let’s define a simple component that displays an input area and some text that goes with the w field in the atom that was defined previously.
(defnexample[][:div"Your input here:"[:input{:type"text":value(:w@status):size"5"}][:br]"Your input, squared: "[:span(*(:w@status)(:w@status))]])
The general format for creating an HTML element inside a component is to create a vector whose first element is a keyword giving the HTML element name, a map of its attributes (if any), and the element content, which may contain other elements. The value of the input field and span are provided by the current value of the :w key in the status atom. Unlike Quiescent, you must dereference the atom.
The only thing remaining to do is to render the component. You don’t have to request animation frames; Reagent handles that for you.
(defnrun[](reagent/render[example](aget(.getElementsByTagNamejs/document"body")0)))(run)
Reagent’s render function takes two arguments: A call to the component and the DOM node where you want the component rooted. In this case, the first (and, we hope, only) <body> element.
If you compile this code and then load the index.html file, you will see a zero in the input and output area - but you will also find that you cannot type into the field. That is because Reagent and React always keep the DOM value and the atom value synchronized, and since the value in the atom never changes, neither can the field. To fix that, add this code to the input element (it is in bold):
(d/input{:type"text":value(:wstatus)<strong>:on-changeupdate-value</strong>:size"5"})
And then write the update-value function, which takes the value from the event target and puts it into the atom that keeps the page’s state.
(defnupdate-value[evt](swap!statusassoc:w(.-value(.-targetevt))))
Voilà—your page now updates properly.
Hints
You will have to initialize the values for the image’s original width and height. To do this, you add an
:on-loadclause to the properties of the image component. Its value is a function that handles the event by setting the width, height, original width, and original height. Use thenaturalWidthandnaturalHeightproperties of the image. Those properties do not work with Internet Explorer 8, but will work in Intenet Explorer 9+.Handling the checkbox also requires some extra care. The value of the
checkedattribute isn’t the checkbox’s value, so you will have to directly change the checkbox status with code like this:(set!(.-checked(.getElementByIdjs/document"prop"))Initializing the checkbox takes a bit more work in Reagent. You must define a symbol that adds meta-information to the
examplecomponent. This information includes a function that does the initialization. Here is an example that initializes the example’s input field to the current minute of the hour. You then render the new component:(definit-example(with-metaexample{:component-will-mount(fn[this](swap!statusassoc:w(.getMinutes(js/Date.))))}))If you want to use a list to initialize the drop-down menu, you will need to define a component for menu options and then use
for. This took me a long time to get right, so I’m giving you the code for free with an abbreviated example. React is not happy if eachoptiondoes not have a unique key, so this code adds it.(defnoption[item][:option{:valueitem:keyitem}item]);; then, in the component that builds the form:[:select{:id"menu":on-changechange-border}(for[item["none""solid""dotted""<em>etc.</em>"]](optionitem))]])
See a suggested solution: Solution 5-2.